
 4299
4299
You can use the Resident Services dashboard to view and manage resident-related tasks at your property. The Resident Services dashboard contains multiple tabs, each with its own specific information. This dashboard includes the following tabs:
- Maintenance Requests
- Make Ready
- Promote Roommates
- Unit Transfers
- Renters Insurance
Not all tabs include dashboard tiles. Some tabs include both tiles and data grids while other tabs include only data grids.
Resident Services dashboard filter
You can filter the Resident Services dashboard by property or property list. Click the Property filter ![]() to choose from properties or property lists.
to choose from properties or property lists.
Maintenance Requests
You can use the Maintenance Requests tab to track the progress of open maintenance requests, manage open requests by priority, and view completed maintenance requests at your property. You can also complete open maintenance requests and add new maintenance requests, if needed.
The Maintenance Request tab is the first screen that appears when you open the Resident Services dashboard. The Maintenance Request tab displays dashboard tiles with a data grid containing detailed information based on the selected data point in the tile.
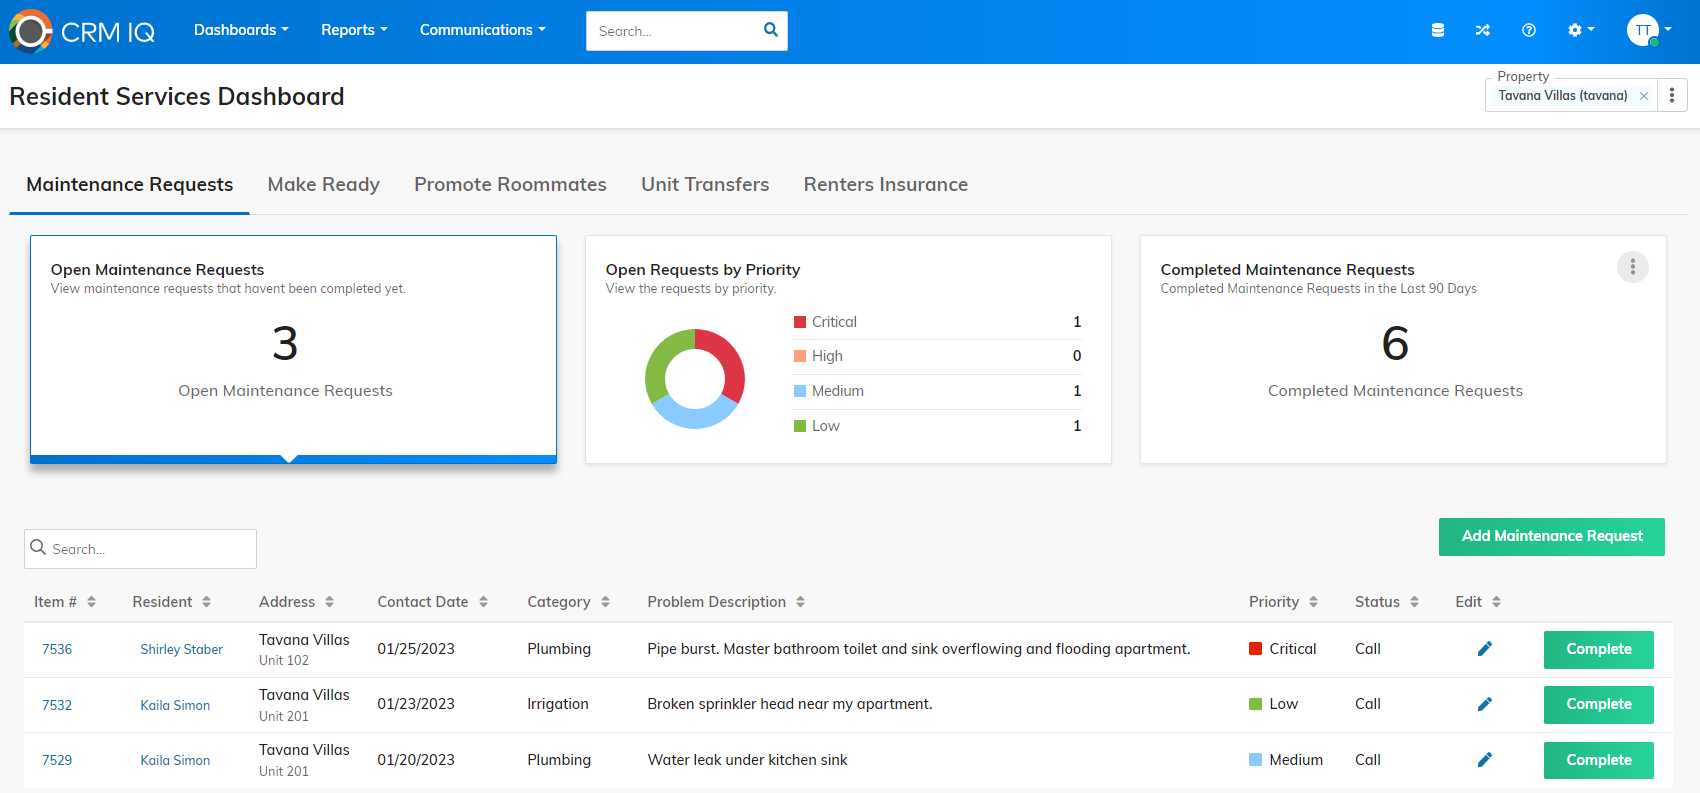
Maintenance Requests tiles
Three tiles appear at the top of the Maintenance Requests tab:
- Open Maintenance Requests
- Open Requests by Priority
- Completed Maintenance Requests
You can click on a data point within these tiles to update the information displayed in the grid at the bottom of the dashboard.
You can change the date range for completed maintenance requests that appear in the Completed Maintenance Requests tile. Date ranges can include completed maintenance requests from the last:
- 90 Days
- 6 Months
- Year
To change the date range, click the Options button ![]() in the top-right corner of the tile and select a new date range from the dropdown menu.
in the top-right corner of the tile and select a new date range from the dropdown menu.

|
Open Maintenance Requests |
Displays number of open maintenance requests that are not yet completed. |
|
Open Requests by Priority |
Display number of open maintenance requests by priority:
NOTE The maintenance request priority levels are not customizable. The priority levels set in Voyager must match these priorities for the maintenance requests to populate. |
|
Completed Maintenance Requests |
Displays number of completed maintenance requests for the selected date range. |
Maintenance Requests grid
The Maintenance Requests dashboard grid dynamically displays maintenance request details based on the data point you select on a maintenance request dashboard tile. Click the Add Maintenance Request button to create a new maintenance request.

|
Item # |
Maintenance request number. |
|
Resident |
Resident associated with the maintenance request, if applicable. |
|
Address |
Property and unit associated associated with the maintenance request. |
|
Contact Date |
Date on which the maintenance request was submitted. |
|
Category |
Type of maintenance request. |
| Problem Description |
Brief description of the problem. |
| Priority |
Maintenance request urgency:
|
|
Status |
Current work progress on the maintenance request. |
|
Edit |
Opens the Edit Maintenance Request screen for editing. |
|
Complete |
Opens the Complete Maintenance Request [Number] screen for adding tech notes and marking the maintenance request complete. |
|
Completed |
(Completed column only appears when you select the Completed Maintenance Requests tile.)
Date on which the maintenance request was completed. |
|
View |
(View column only appears when you select the Completed Maintenance Requests tile.)
Opens the Edit Maintenance Request window in display mode. |
Make Ready
The Make Ready tab displays a grid with units that are scheduled for make ready completion at your property. Make Ready is the process of preparing a unit for a new resident to move in. For example, the make ready process for a unit might include cleaning, painting, and general maintenance and repairs. When the make ready process is complete for a unit, you can select the Make Ready button to make the unit available for a new resident to move in. You can also change the date when a unit will be ready for completing the make ready process.
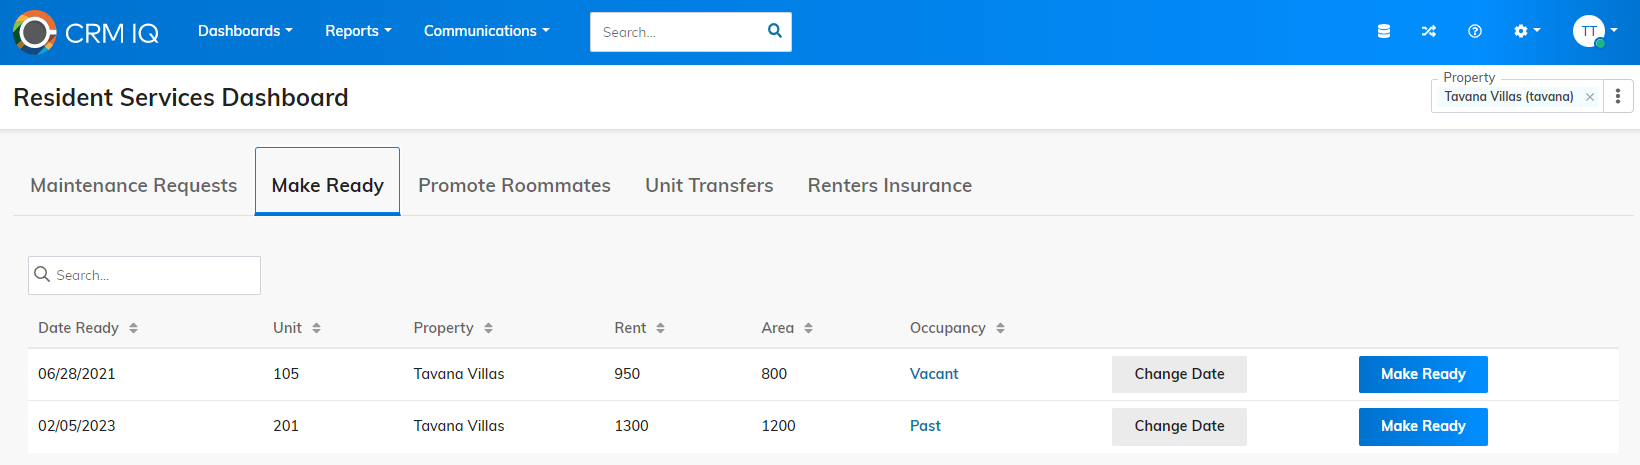
|
Date Ready |
The date on which the make ready process is scheduled to be completed for the unit. |
|
Unit |
Unit number scheduled for the make ready process. |
|
Rent |
Unit rent pricing. |
|
Area |
Unit square footage. |
|
Occupancy |
Current occupancy status for the unit. Unit occupancy statuses include:
|
|
Change Date |
Opens the Change the Make Ready Date window. |
|
Make Ready |
Opens the Make Ready window. |
Promote Roommates
The Promote Roommates tab displays a grid with scheduled roommate promotions at your property. The Promote Roommates function promotes a roommate to the primary resident when the primary resident moves out and the roommate opts to remain in the unit. You can also cancel a roommate promotion, if needed.
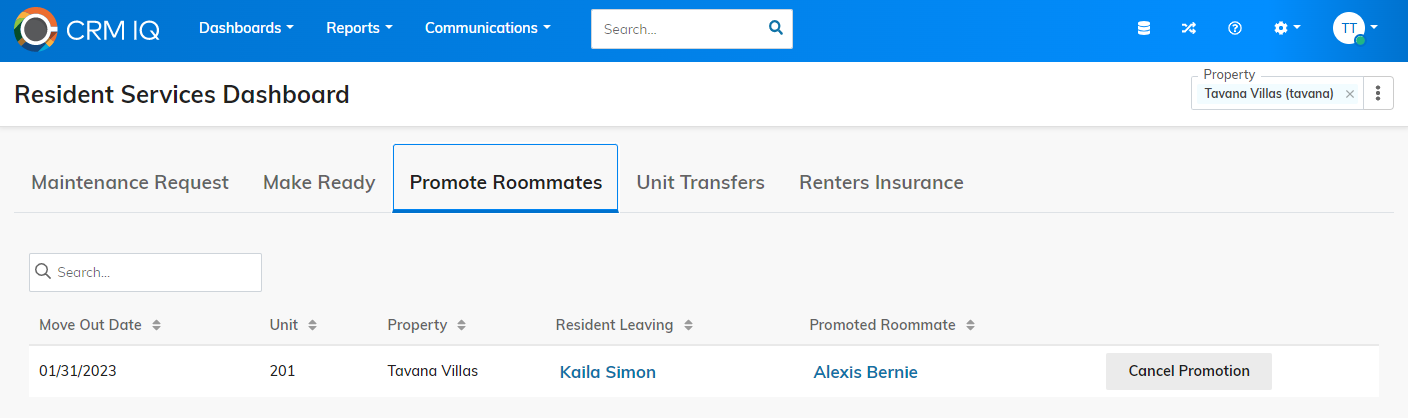
|
Move Out Date |
Date on which the primary resident is scheduled to move out of the unit. |
|
Unit |
Unit number for the unit where the roommate promotion is scheduled to take place. |
|
Resident Leaving |
Name of the primary resident scheduled to move out of the unit. |
|
Promoted Roommate |
Name of the roommate being promoted to primary resident in the unit. |
|
Cancel Promotion |
Opens the Cancel Promotion window. |
Unit Transfers
The Unit Transfers tab displays a grid with scheduled and in-progress unit transfers at your property. From this tab, you can adjust move-out or move-in dates, complete move-ins or move-outs, and cancel move-ins or notices for units. The resident fields in the grid are hyperlinked to the resident relationship record for the residents involved in the unit transfer. Click on any resident's name in a row to open the corresponding resident relationship record.
![]()
|
From Property |
Property and current unit from where the resident is transferring. |
|
From Resident |
Resident who is scheduled to transfer from the current property and unit. |
|
Move-Out Date |
Move-out date for the current primary resident. |
|
To Property |
Property and new unit to which resident is transferring. |
|
To Resident |
Resident who is transferring to the new unit. |
|
Move-In Date |
Move-in date for the new resident. |
|
Actions |
Shows actions you can perform for the resident. You can perform any of the following actions for a resident, depending on the resident's occupancy status. For example, if a resident's occupancy status is Past, the Change Move Out Date option will not appear.
|
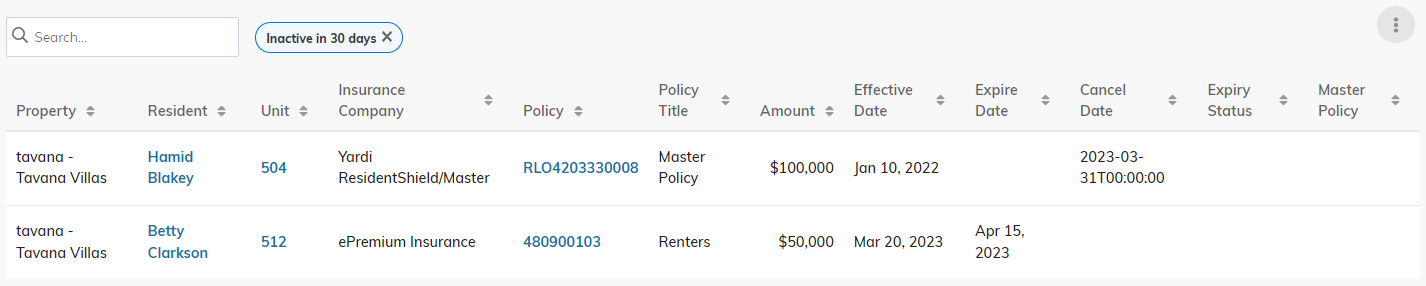
Renters Insurance
The Renters Insurance tab displays information about the renters insurance policies at your properties. Use the Renters Insurance tab to identify which units meet the property's renters insurance requirements, what types of policies are in effect at the property, and which policies are expiring soon or are already expired or cancelled. The Renters Insurance tab displays dashboard tiles with a data grid containing detailed information based on the selected data point in the tile.
Renters Insurance tiles
Three tiles appear at the top of the Renters Insurance tab:
- Covered and Uncovered
- Expired/Cancelled, Inactive in 30 days
- Policy Type
You can click on a data point within these tiles to update the information displayed in the grid at the bottom of the dashboard.

|
Covered and Uncovered |
Covered Units Units with active renters insurance policies. Uncovered Units Units without active renters insurance policies. |
|
Expired/Cancelled, Inactive in 30 days |
Expired/Cancelled Displays policy information for residents whose renters insurance has expired or was canceled.
Inactive in 30 days Displays policy information for residents whose renters insurance will expire in the next 30 days. |
|
Policy Type |
Master Policy Displays policy information for residents enrolled in the Yardi ResidentShield Master Policy program.
Override Policy Displays policy information for residents with override policies.
Third-party Policy Displays policy information for residents with active renters insurance from third-party insurers. |
Renters Insurance grid
The Renters Insurance dashboard grid dynamically displays detailed information about the renters insurance policies for the property based on the data point you select on a renters insurance dashboard tile. Some fields in the grid are hyperlinked to a corresponding record. Click any hyperlink in a row to open the record for the selected field.
|
Property |
Property where resident is insured. |
|
Resident |
Name of the resident who owns the renters insurance policy. |
|
Unit |
(Appears when you select the Covered and Uncovered dashboard tile.)
Category of units to which the unit is assigned. |
|
Unit Type |
(Appears when you select the Covered and Uncovered dashboard tile.)
Category of units to which the unit is assigned. |
|
Insurance Company |
Name of the insurance company that provides the renters insurance policy. |
|
Policy |
The unique code or number that identifies the resident's renters insurance policy. |
|
Policy Title |
Name of the renters insurance policy. |
|
Amount |
Value of the renters insurance policy. |
|
Effective Date |
Date on which the renters insurance policy begins. |
|
Expire Date |
Date on which the renters insurance policy ends. |
|
Cancel Date |
(Appears when you select the Expired/Cancelled, Inactive in 30 Days dashboard tile.)
Date and time when the policy was cancelled. |
|
Expiry Status |
(Expiry Status column only appears when you select the Expired/Cancelled, Inactive in 30 days dashboard tile.)
Status since the renters insurance policy expired or was cancelled. |
|
Master Policy |
(Master Policy column only appears when you select the Expired/Cancelled, Inactive in 30 days dashboard tile.)
Indicates whether the resident was enrolled in the Yardi ResidentShield Master Policy program. |
Display settings
You can dynamically customize display settings in the dashboard grid through the Table Settings button ![]() . You can show, hide, and rearrange columns and save up to five table views for future use. You can adjust row height to enhance readability and apply shading to alternate rows to further delineate row details.
. You can show, hide, and rearrange columns and save up to five table views for future use. You can adjust row height to enhance readability and apply shading to alternate rows to further delineate row details.

How to do it
- In the top-right part of the dashboard grid section, click the Table Settings button
 . The Display Settings screen appears.
 - To increase the row height, on the Display Density setting, click the Plus button
 .
. - To decrease the row height, on the Display Density setting, click the Minus button
 .
. - To customize the dashboard grid columns:
- Select Customize Columns. The Customize Columns window displays.
- To show a saved table view, in the Show Table dropdown list, select a table view name.
- Select the checkboxes next to the column names you want to show.
- Clear the checkboxes next to the column names you want to hide.
You can choose up to ten columns to show or hide in the table view.
- To reorder the selected column names in the table view, drag and drop the column names to where you want them.
- To save the table view, click Save As, enter the table view name, and click Save.
- To save changes to the saved table view, click Save.
- To remove a saved table view from the Show Table list, in the Show Table dropdown list, select the table view name and click Delete.
- To apply shading to every other row in the dashboard grid, select Shade Alternate Rows.

